Please note: In any event, the values of pressure and model selection in the Model Selection Guide are to be used as reference.
Model Selection
Ordering Guide HemaClear® Measuring Tape
Side 1: HemaClear® Measuring-Tape – General for 8 HemaClear® Models
Side 2: HemaClear® Measuring-Tape – General for Model A and Model F
The HemaClear® Measuring-Tape is used in conjunction with the HemaClear® Selection Guide and HemaClear® Pressure Charts while applying the device.
It accompanies all HemaClear® products. It is printed on both sides to be used with the full HemaClear® Product Line
 HemaClear User-Guide
  HemaClear® Protective HemaClear Cutting Guard
 HemaClear® Pressure Charts

HemaClear® Pressure Charts printed version
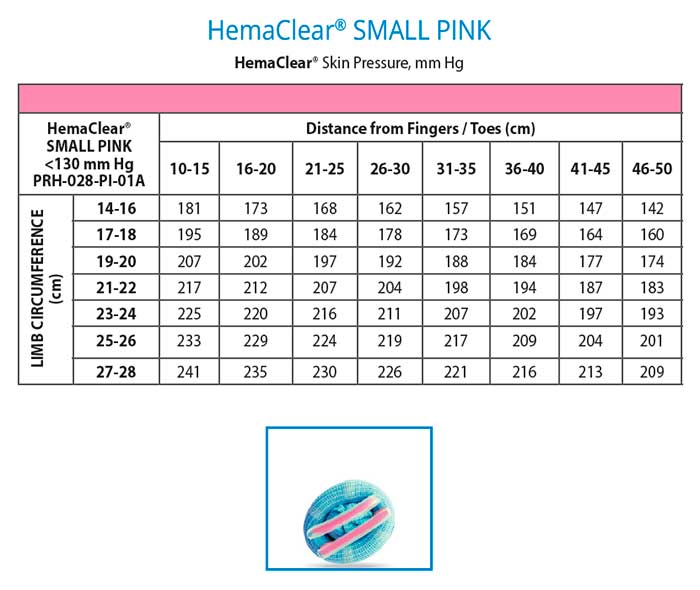 Pressure Chart HemaClear® Small Pink
  Pressure Chart HemaClear® Medium Red
  Pressure Chart HemaClear® Medium Green
  Pressure Chart HemaClear® Large Brown
  Pressure Chart HemaClear® Large-Orange
  Pressure Chart HemaClear® Large Blue
  Pressure Chart HemaClear® XLarge B&W
  Pressure Chart HemaClear® Model F
  Pressure Chart HemaClear® Modle A
HemaClear® Rolling Tube with elastic band
Tutorial for Rerolling the HemaClear® Demo Unit
- Place the following items on the table in front of you: Rolling Tube, Elastic Band, and the HemaClear® Demo Unit
- Place your hand inside the HemaClear® Demo Unit, pulling one of the handles towards the body. Continue to roll the HemaClear® as high as possible on the upper arm, while the handle is pulled across the chest.
- Following the application of the HemaClear®, roll the Demo Unit down over the hand till it has been removed.
- Unroll the Stockinet until the straps are in their original position, with the correct space between them.
- Fit the unrolled Demo Unit onto the Rolling Tube.
- Position the straps evenly on each side of the Rolling Tube.
- Apply the elastic band to the tube as shown in the video (1:39 mins). Make sure the straps are firmly stretched.
- Roll the Stockinet downwards and continue rerolling as shown in the video (2:15 mins). Always ensure the straps are tight and in the correct position.
- Prior to the final roll, remove the elastic band and finish rerolling.
- Release the Demo Unit from the Rolling Tube.
- Place the elastic band on the Rolling Tube for future use.
- The process is complete.
- Thanks for watching this HemaClear® tutorial.
Learn About HemaClear®
Request more information...